Showing posts with label halloween. Show all posts
Showing posts with label halloween. Show all posts

a friend asked me to do a party for her son's 3rd bday.
he LOVES penguins, but the party
is near halloween so she wanted to combine both themes...
hmmm... penguins and halloween...
this is a challenge!
then something amazing happened...
i found penguins in halloween costumes clipart!
how perfect.
the penguin clipart was designed by craftshackdesign

my real camera is under the weather, so these are
from my phone. not good.

aren't the penguins cute?!

welcome sign


banner: "happy birthday"


banner 2 "beckett"

favor tags

fill in the blank thank you card
{the paper for the banner and favor tags
was purchased at hobby lobby and joann fabrics}
as always, this and other custom parties are available in

when i saw the idea for this costume on pinterest,
i knew my oldest daughter would love it.
her beloved 1st grade teacher was partial to owls,
so they have become a close 2nd to elephants here.
unlike my sister who makes half of her kids' clothing herself,
i do not get a long with my sewing machine.
we have a fight and almost breakup every time i use it.
my glue gun on the other hand is the love of my life!
i made this costume entirely with hot glue!

here's how i did it...

i bought a few yards of felt for 50 % off so it was super cheap
{like maybe $6 total}
i chose 3 coordinating colors.
next, i cut a feather out of card stock
and then traced it over and over on the felt.
cut out all the feathers and warm up the glue gun.

i used a hand-me-down dress that was the shape i wanted

i forgot to take a picture after the first row, but basically just
glue down the top half of each feather, doing one row
{all the way around - front and back} at a time.
i didn't stick to a set pattern with the colors, just
tried to keep a color from bunching together too much.

once the dress was finished, i was so excited to show her.
i made her try it on the second she got off the bus.
first words out of her mouth: "where's the wings?"
my inspiration picture didn't have wings....
but i came up with the shape above,
cut it out and glued it inside the shoulder strap of the dress.

if you look closely, you can see a black jelly bracelet
{pinned for now..will stitch in place soon}
this keeps the wings attached to her arms,
but if they are annoying her she can take off the bracelet
and let them flap behind her!
{the hat}

i saw this hat on pinterest and pretty much copied it.
we bought a woman's hat
(i recommend this because you lose a lot of the
hat height when creating the owl head shape)
okay, for this "i" did sew. when i say "i", i mean
my mother-in-law sewed the hat.
we traced a half circle onto the inside of the hat,
cut and sewed it back together.
check out the link for much better instructions!
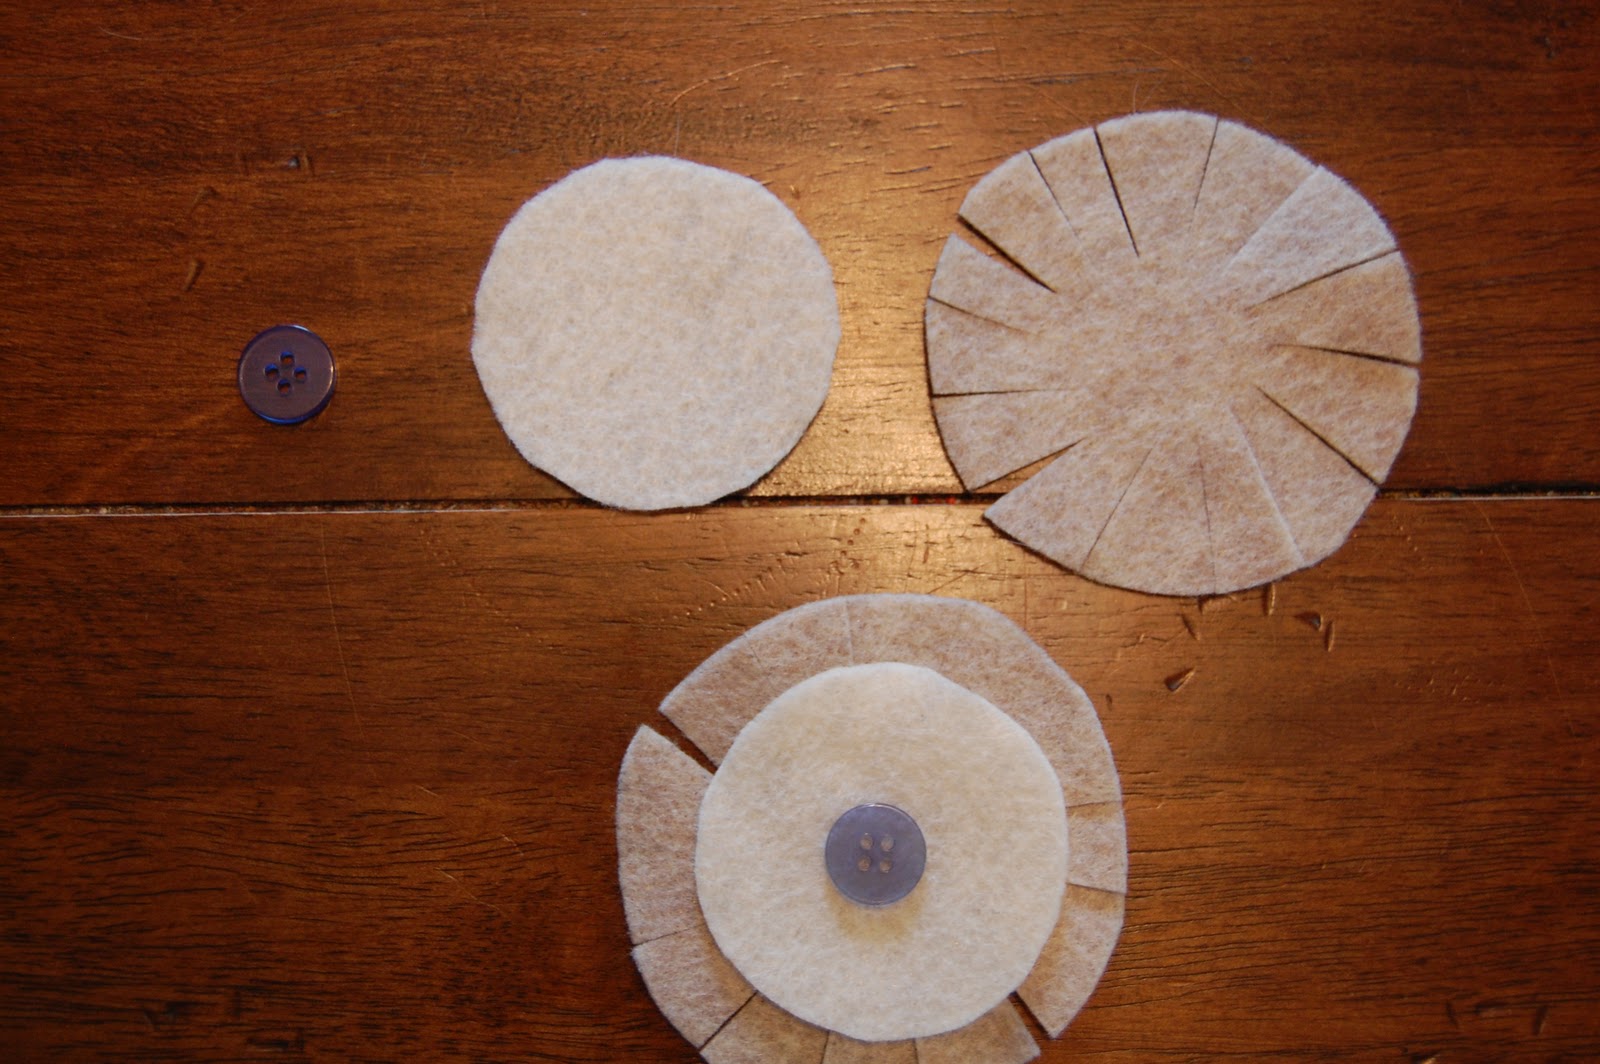
button + circle + circle with slits + hot glue = owl eye

ta da!

fly away owl!
my other daughter loves bunnies, i honestly
don't know how we haven't had a bunny costume before.
the costume all started with this
ADORABLE hat

i purchased it from babamoon on etsy
it is so cute and very soft. she was so fast too!

we bought a tutu skirt from target and then my mother-in-law
sewed the fur boa to the edge.
i took a pink shirt and added a couple layers
of white fur with the glue gun.
instead of adding fur to the sleeves,
i wrapped more of the fur around jelly bracelets.
this way, if she has to wear a sweatshirt for trick or treating
the fur will not be covered.

bunny tail!

so here is what i'm planning for
classroom parties this year.
no food pictures yet, but there's some
fun ideas that were inspired by pinterest.
you can see all my pins here.
{spooky water}

make water bottles a little more fun by wrapping them with scrapbook paper.
1) take one wrapper off and make your strips the same size.
2) i took off all the wrappers because the new labels stick to the old
glue, but you do not have to do this.
3) wrap and secure with a piece of clear tape.
{mummy juice boxes}

the full tutorial on how to make these is here.

as i wrapped these, i used less tape and they still looked great.
in the tutorial, it shows the top being taped,
i did this until the end when i started to run low on tape.
for the last few i didn't and i think they looked fine without it,
so next time i would skip that step.
it took me 2 rolls of white electrical tape to do 23 boxes.
{games}

i made this monster bingo game using
the create your own monster clipart
from cloudstreet.
(contact me if you are interested in purchasing
the printable version of this game-
8 unique boards and calling cards for $5)
we are also playing pumpkin bowling

(picture from pinterest)
go here for the original directions
i purchased a "funkin" to use since the party is indoors.
{favor bags}

honesty, i can't stand favor bags.
but i know the kids like them so i got just a few items.
i added a little fun by making the toppers and also stuffing
the bags with that cheap spider web.

making the topper is so easy.
i bought favor bags that were 4 inches wide,
so i cut my scrapbook paper to be 4 inch x 4 inch and
folded them in half.
i folded the bag down to fit close to the prizes
then stapled the topper over the fold.

i loved how this one said
"trick or treat...smell my feet..."
and i'm sure the kids will get a kick out of it!
- - - - - - - - - -
oh and check out the invites we made for
our annual trick or treat party!

i saw the cute witch broom treat bags martha stewart made
and i decided i could use them as invites instead!

i followed her directions (i just stuffed with tissue not candy)

and slipped the invitation strip through the slits.
i think they are so cute!

i get so many great ideas for holiday decorating
from blogs and pinterest,
but wish i could find more
unique ideas for classroom parties.
i hope to find some more good ones to use in a few weeks,
but i thought i'd share what i did last year.
for my daughter's class party we decided one of
the activities would be a craft/snack.

the kids made these cute spiders.
i had seen the idea on a blog but for the original,
a lot of melted chocolate was used.
that wouldn't work for a classroom project,
so here is how i tweaked it.

you need:
brownie bites
pretzel sticks
mini marshmallows
nerds

you use the marshmallows as "joints" to join
2 pretzels together making a leg

repeat for the rest of the legs.
{we only had 4 legs}
{we only had 4 legs}

tear a marshmallow in half.
{the sticky part attaches to the brownie}
and
stick 2 nerds into the marshmallows.

fun right?
fun snacks

i wanted to use cupcake toppers that
i had made, but didn't want to bring cupcakes.
so i stuck them into cubes of cheese.
all the kids wanted the toppers so they picked the cheese
even though there were tons of other sweats!
{they still ate the other sweats...but they ate cheese too!}

aren't these witch hats cute??
just take a hershey kiss
dip in melted chocolate {or melt the bottom of the kiss}
stick to the flip side of a chocolate striped cookie.
the example i saw had a piped bow, but i don't pipe...
so i used 2 pumpkin sprinkles & 2 orange jimmies!

{healthy candy corn}
white ~ bananas
yellow ~ yellow peppers
orange ~ carrots
now lets hope that this guy has a better halloween this year!


i can sew. well kind of...
i can make pillow case dresses out of bandanas
(half the seams are done for you!)
and i can make leg warmers out of knee socks.
so i thought... hey i could make a "real" costume this year.
like use a pattern and everything!
stay tuned to see how that turned out...
but first, here are the finished products:
of course she wanted to be jessie
(see why here)

and after a year free of princess costumes,
she begged me for this one
it's so pretty how can you say no?
(& he got stuck as her side kick)
princess & the frog


princess tiana

i felt bad that i was spending so much time on the
other costumes and all she got was a dress
but then i found this hat here on etsy.
i think it's hilarious! and she loves it!
the jessie costume:

i made a braid out of red yarn and hot glued it to the hat.
she is very detail oriented and also requested
a "pull string". of course! (she's just like me)
i used a strofoam ring i found in the floral department at joanns
and wrapped it with ribbon.
then i hot glued the end of the ribbon to the shirt.

for the shirt, i bought a white dress shirt.
i made a template out of paper then traced it out onto the yellow fabric.
i cut it out, used that liquid seam stuff and then
stuck it on with iron on transfer or whatever you call it.
(can you tell i'm an expert yet?)
the i looped some ric ric and hot glued it on.

for the sleeves, i ironed on the the fabric again.
i just sliced the fabric with a craft knife so the button can get through.
i added the ric rac and little yellow loops of ribbon to match jessie's.

heaven forbid, my daughter would have to wear pants,
PANTS!?
so i said i would make a skirt. we had this jean skirt
that was a little too "western" for every day so it was perfect!
the cowprint is a bandana (remember what i said about the seams).
i did have to cut and sew 2 pieces together.
but i decided to leave the top "rough"
you know that deconstructed look is really trendy right now!
i learned how to make a ruffle from My Backyard Eden
then i hot glued it onto the skirt.

finally, the belt is just made out of felt.
they had this nice felt with a design on it too.
the belt is hot glued together,
but i added velcro circles to "buckle"it.
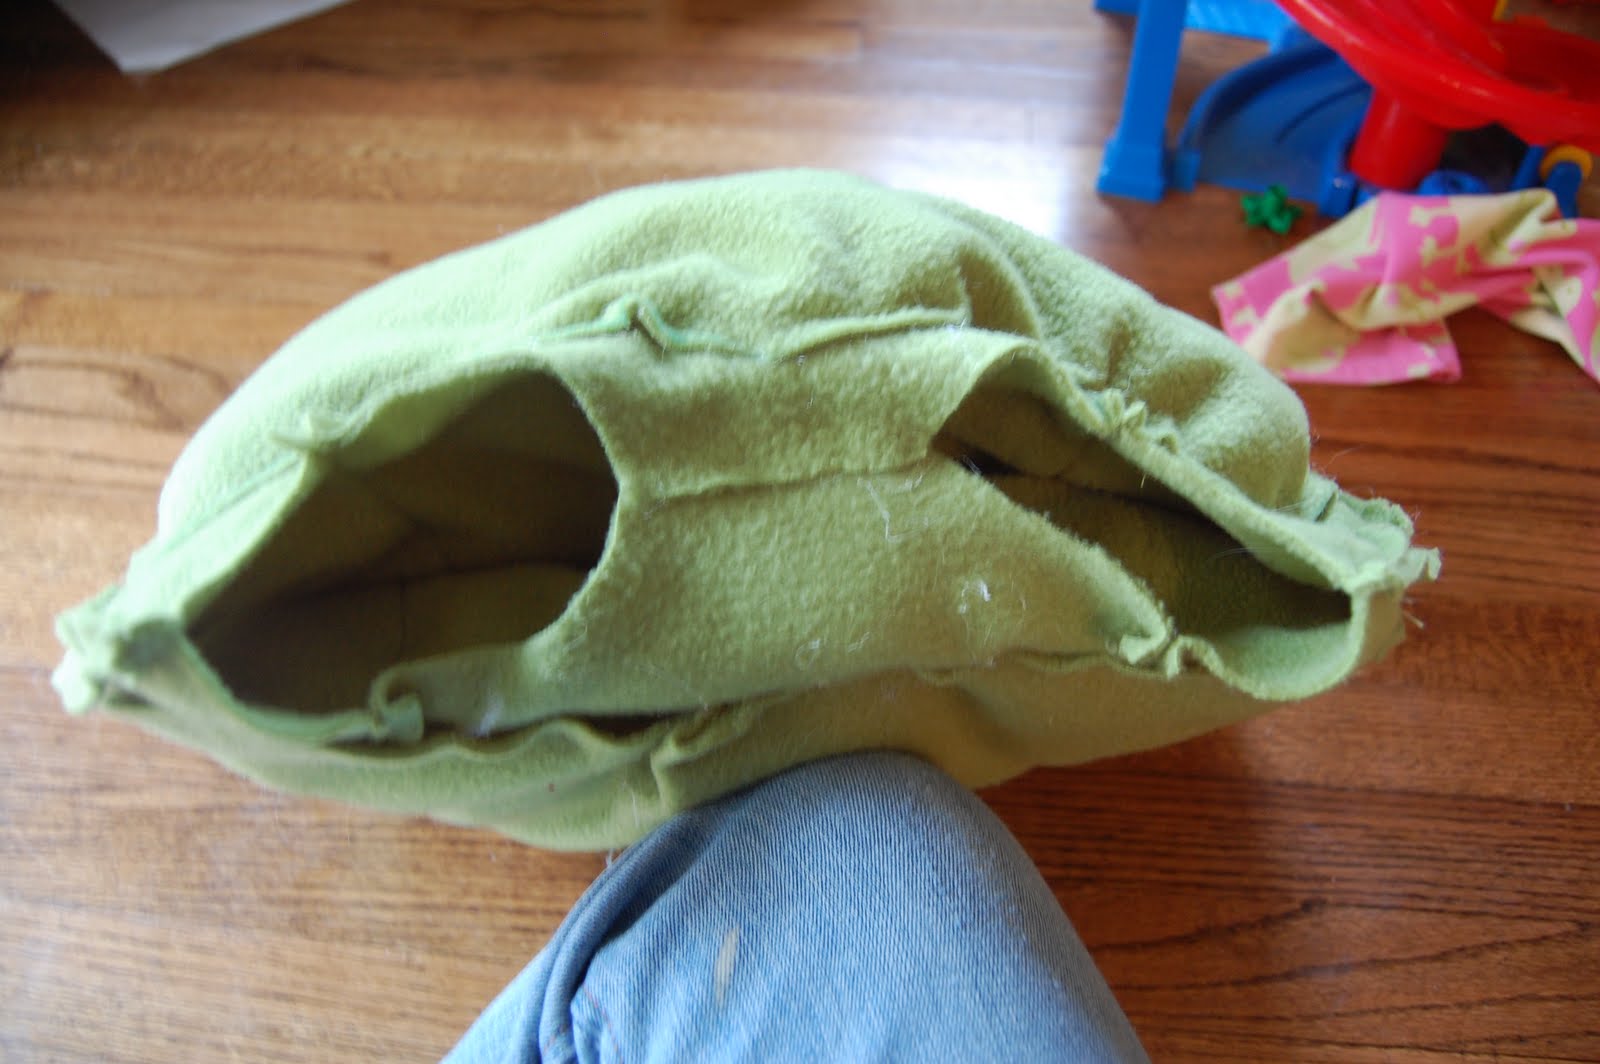
frog:

here is where the story of the pattern comes in.
i looked everywhere for something I could use
for his costume. ( i knew i wanted to use this hat)
but finally i broke down and bought the $10 pattern
(which by the way was 99 cents 2 weeks later...
after my receipt was long gone!)
it was actually for a duck...but i could work with that.
anyway, after pinning/cutting out 8 pieces
and reading that i would have to pin/cut about 12 more,
i decide to veer off the pattern.

i had the shell done,
so i just cut out a piece of fleece and hot glued it to the inside of the shell.
then i stuffed it with polyfill and hot glued the last side shut.
i did the same thing on the back side.
the bottom was supposed to be elastic, but that involved
a lot more sewing and stringing through the elastic...
plus i thought it kind of looked like a dress.
so i decided to make it more like a onesie.
i trimmed it down on the sides
and cut the shape for the leg holes.
then i hot glued the flaps together.

by this time, i have no idea what i was supposed to
do according to the pattern.
i put velcro circles on the the shoulder straps
(reinforced with hot glue).

and here is the finished product!

onto the feet.
i cut out this shape two times for each foot.
i also cut it out of cardstock.
then i glued them all together (cardstock
in the middle for structure)

i added a ring of elastic to go around his leg
and the velcro on his shoe goes through
the ribbon to keep the foot in place.
i'm so excited with how it all turned out!
i think i learned that i'm not a "pattern" person.
i just don't like all the rules!
i would like to point out that i don't expect that this costume will
last and be passed down to his children like the rainbow bright
costume my mom must have spent
thousands of hours sewing.
but i'm okay with that.
i hope that this inspires other people who don't necessarily have
sewing "skills" to go ahead and try to create
something. sewing machines are great,
but so are glue guns!!
Subscribe to:
Posts (Atom)

Social Icons